October 2023 Instructions:
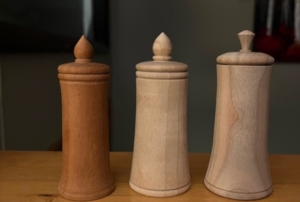
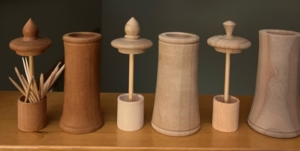
Toothpick Dispenser
Start with a blank at least approx 2†in diameter and 6†long. Turn between centers and make a tenon on each end to match your chuck jaws. If you only have 50mm jaws (standard with most chucks), and your blank is only 2â€, make sure to size your tenon before making the entire blank round. If you start by rounding then your blank may be smaller that 50mm and your tenon will be too small for the jaws. If you have 2 chucks, make one end fit each different chuck.
After tenons are made on both ends, mark out where the bottom of the dispenser will be. This will be approx 1/4†from the left hand tenon (enough for a parting cut and some wiggle room).
Next mark a line at least approx 3 3/4†from the first line which will be the top of the dispenser base. This can be longer if you want, but not much shorter to allow room for the dispenser stem.
Make a parting cut mostly through the blank at the line for the top. Finish the cut with a hand saw (lathe off ! )
Mount the bottom portion in the chuck and flatten the face with a spindle gouge, bowl gouge or skew. Make a small dimple in the center for the forester bit to register in.
Use a parting tool to define the bottom edge to help visualize your shape, do not part in too much so as not to weaken the blank at this point. Now you can use a gouge to make the outside shape. I like them to be larger at the base for stability but they can be whatever shape you like. Make sure to allow sufficient wall thickness for the size forester bit you will use in the next section. I made sure the thinnest diameter was no smaller than 1 1/2â€. Make this larger if you use a larger forester bit for the center. Once you are happy with the shape you can sand and finish the bottom at this point.
I used a 1 1/16†drill bit for the dispenser bottom center hole and a 7/8†bit for the dispenser well center hole but these are not critical sizes. What IS important is that the difference between the 2 allows sufficient width for the dispenser well wall thickness plus a small gap between the well and the dispenser base side walls. In my case this is 3/16â€.
Mount the larger forester bit in a drill chuck in the tailstock. Slowly drill a hole 3 3/8†deep measuring from the wings of the forester bit. If your bottom is marked out at 3 3/4†this will allow 3/8†for the bottom which allows for the forester bit point not to punch out the bottom. If you are new to drilling on the lathe with a forester bit, keep in mind the you need to drill an inch or so at a time then back out the bit with the lathe off and clear the chips out. Drill at around 500 RPM.
This is where having 2 chucks comes in handy. If you have 2, remove the first chuck while keeping the base still in it. Then mount the top lid section in the second chuck. If you only have one chuck, mark the jaw position on the dispenser base so it will go back into the chuck again in the same position.
With the dispenser lid in the chuck, clean off the face and make a dimple in the center for a drill bit. You will use a parting tool to make a 3/16†long tenon to fit in the dispenser base hole that was drilled with the forester bit (mine was 1 1/16â€) . Check the fit frequently as you sneak up to a tight fit. You will be using the first hole as a jam check so it needs to be snug.
Determine the size of the stem that you will be using. This can be a bamboo skewer or a 3/16†dowel or something similar. Drill some test holes in a scrap of wood to find a drill bit that will make a hole that will fit the stem. Mount this drill bit into the drill chuck in the tailstock and drill a hole approx 1/4†deep into the bottom of the dispenser lid. Sand and finish the bottom of the lid and the tenon, being careful to not alter the tenon dimension.
Remount the dispenser bottom. Put the lid section in place and pull up the tailstock into the original hole in the lid end. The tailstock can be kept in place for support until the last minute. Use a spindle gouge to shape the lid and form a small knob/finial but do not complete the topmost portion until you have sanded and finished the bulk of the lid. Once you are satisfied with the lid, part down then cut off with a hand saw. If your tenon is snug you should be able to finish the top point using gentle cuts. If it is a bit sloppy you could use tape around the joint or a paper towel in the joint.
After the top is complete, remove it and sand the inner surface of the bottom hole to allow for easy on and off of the lid. You want the lid to be easy removed without lifting the bottom off the table. You can carefully lightly sand the entire hole with a rolled up piece of sandpaper if you like. Do not use any kind of smelly finish inside or it might make your toothpicks taste funny.
Part-off the bottom with a parting tool. Make sure to part straight in or at a very slight angle up into the bottom so it will sit flat on the table. If you are nervous to part all the way through, you can part most of the way and finish with a hand saw. You will then need to carve or sand away the remaining nub.
Mount a scrap piece of wood for the dispenser well in a chuck. You will need a piece with a minimum 1 1/2†beyond the chuck jaws, 2†is even better. Clean off the face and make a dimple for the smaller (7/8â€) forester bit. Drill a hole approx. 7/8†from the wings of the bit. Turn the piece to round so that it fits just inside the dispenser base. It should not be so snug as to want to catch as it goes in and out. Sand the outside and top edges. The wall thickness at this point should be a little less than 1/8â€. Mount the stem size drill bit and drill a hole approx 1/8†into the well for the stem. It just needs to fit the stem snuggly. Mark the well base 1 1/8†to 1 1/16†down from the top edge. Part off at this line. If all is well there shouldn’t be a hole through the bottom! Hand sand the bottom and nub if needed although the only people that will see this is your crazy woodturning friends. You can even reverse jam chuck it if you really want to.
Now guess-timate the length of the stem, erring on the long side (start with 3 1/2â€) . Push it into the well and lid and see if fits. Trim accordingly. Use a drip of super glue to secure.
These measurements work for toothpicks a little over 2 1/2†long. If yours are longer you may need to adjust.


